My current top load is two home made toroids - a small 4.5" x 15.5" toroid
made from aluminum flex duct, stiffened and smoothed with 2-part wood filler
and spakel, covered with aluminum tape, and stacked on top of that is a large
6" x 23" toroid made from aluminum flex duct, covered with aluminum tape.
As I now get multiple streamers, even when I have a deliberate breakout point,
I know that it's time for a larger toroid. The bulk-buy on the Pupman Tesla
Coil Mailing List for the 6"x24" spun aluminum commercial toroid was tempting,
but as it really wasn't larger than what I have now, wouldn't help me. And
chances were that a commercial toroid as large as what I need would be very
expensive. I could again go the route of using corrugated aluminum duct ,but
this technique has real durability issues, as they're very easily dented.
I did some experiments using aerosol foam to fill the duct to stiffen it.
The foam hardened very well, but the problem is that it slowly continues
to expand over 1-2 days, and ruptured the joint of the duct. Plus I'm still
left with a less than smooth corrugated surface finish, even after covering
with aluminum tape.
I came across a company in Ohio, Global Manufacturing Solutions, which makes
custom plastic and foam parts, largely for theatrical props. I inquired and
they were very willing to make me a toroid to my specifications. As they have
a completely computer-controlled milling machine operation, it didn't matter
how complex (my speculation here) the shape was. A pseudo-toroid (hole filled
in) would be the same price as a normal toroid. And they can make it out of
a wide variety of materials. As I was concerned with the final product being
dent-resistant, I initially asked for the densest foam they could source.
They normally work with 2 lb (per cu ft) styrofoam, but could also order 3
lb or 5 lb foam. It turned out that the material cost for the 3 and 5 lb foam added
considerably to the total cost, so I settled for 2 lb styrofoam. For reference,
the material used to make styrofoam coffee cups is 1 lb styrofoam.
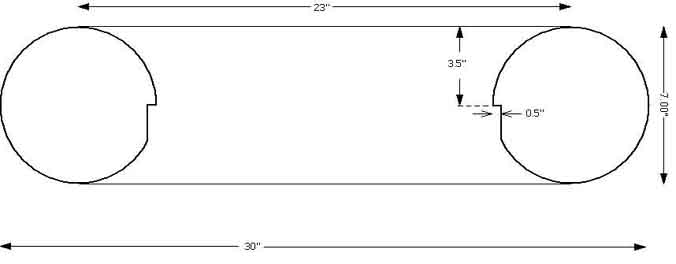
With the corrugated duct toroids, it was always a bit of a trick to get the
center disk to just the right diameter that I could glue it securely. To improve
upon this I added a feature to my toroid, adding a route to create a ledge
around the inner perimeter that the disk will rest against, so that the disk
diameter isn't critical. Since the e-field inside the toroid is low, the edge
of this route shouldn't cause any problems. Below is the drawing that I supplied
to Global Mfg Solutions:
The finished product arrived well packed and in good shape. The foam density
was better than what I had been expecting. It is much denser than a coffee
cup, but not as dense as a Styrofoam bicycle helmet. If I press very
hard with a fingertip it will leave a small dent. The surface finish
was pretty good.
The cost was $115, plus $30 for shipping from Ohio to Massachusetts (!).My
contact was:
William Bankes
Vice President
Global Manufacturing Solutions
9562 N. Dixie Hwy
Franklin, Ohio 45005-1106
513-743-9911
Web Site: WWW.Globalms.com
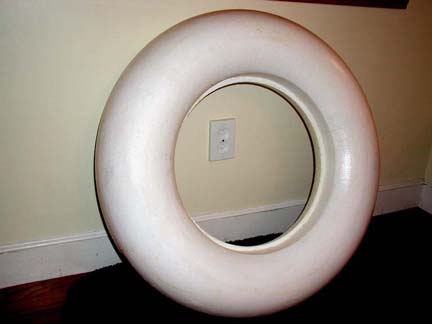
Here is the delivered product. The yellowish coating is two coats of water
based polyurethane (which really served no purpose):
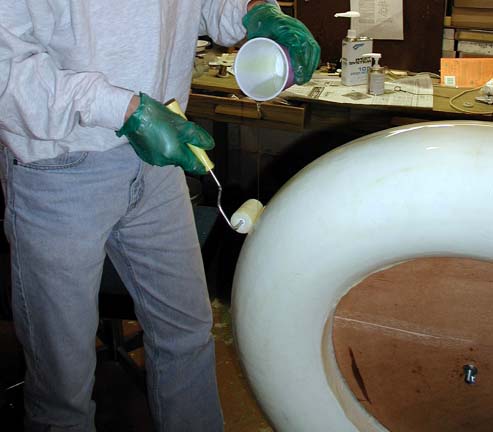
I added a thick coating of epoxy, the kind used for fiberglass repairs, to
improve upon the foam's dent-resistance. I mounted the toroid on a plywood
disk, and mounted this assembly like a tire on a threaded rod driven by an
electric drill, powered by a variac to control the speed. To apply the
epoxy I slowly spun the toroid and poured on the epoxy, and spread it with
a foam rubber paint roller. MUCH better than a paint brush! The
drill was not the best choice to spin the works. At low speeds, the
RPM was not very stable, but it was all that I had. If the speed went
too slow it would stall,and it the speed went too fast it would fling off
the liquid epoxy. So I basically had to baby sit the drill RPM for an hour
or so until the epoxy hardened enough not to run. I applied two very
thick coats. I'm guessing that the total thickness is about 1/8".
The results were beautiful- the finish was smooth like glass.
To make the surface conductive I used MANY strips of 2" wide aluminum tape.
The process of applying this tape to such a large toroid took much longer
than expected, perhaps 5 hours total. Each piece had to be burnished
with a wooden stick to make it lie perfectly smooth.
For the center disk I used a piece of 1/4" plywood. I epoxied heavy-duty
aluminum foil to both sides.
By themselves, each of the aluminum tape strips covering the toroid is not
really connected to the others. An Ohm meter will in most cases show
this. If I simply mounted the foil-covered plywood disk to the toroid,
the contact to each aluminum tape segment would be variable and poor. To ensure
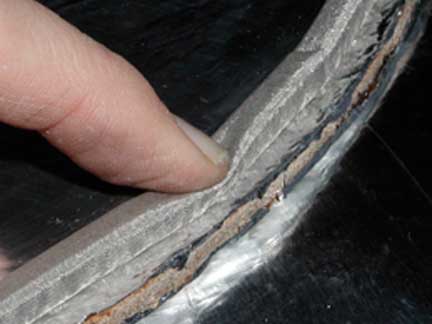
a good connection to each tape segment, I mounted a length of EMI gasket around
the perimeter of one side of the disk. This gasket is a continuous bead
of low density open-cell foam, covered by a tube of thin, flexible, conductive
metal mesh. Under compression, it provides good electrical contact between
irregular surfaces - the disk and the tape-covered ledge on the toroid.
Below is a photo showing the compliant nature of the gasket:
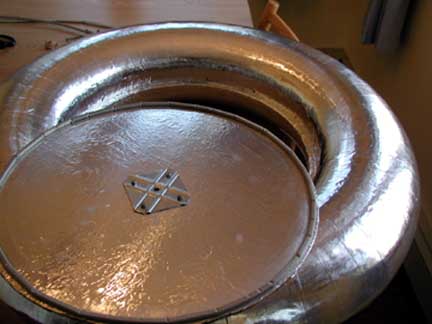
Below is the competed toroid and disk ready to be fastened. The square
in the center of the disk is just there to give the screw that holds the assembly
to the top of the secondary something solid to bite against.
Back to Gary Lau's main Tesla Coil Page